

How To Clean Up 3d Printed "Miniatures"
Time to read: v min
Yous've envisioned information technology, you've modeled it, and you've printed information technology. Every bit it turns out, however, your newly printed prototype may need a flake more than TLC before it appears or functions as intended.
In this article, nosotros'll investigate practical methods for cleaning up 3D printed parts, as well every bit the tools yous should take at your workbench to make these processes as simple as possible.
Luckily, with the exception of specialty appliances that can be used for dual-extruder printers with soluble back up material, everything you demand to get a groovy end to your printed components can exist found at your local hardware store.
Function Removal
One of the most basic tools y'all should have in your 3D press area is a putty knife. Cull a pocketknife with a sparse, flexible metallic blade to let you lot to hands get betwixt the plastic and the printer bed. This allows you to gently pry completed prints off of the print bed while minimizing the take chances of impairment to the office.
Pro Tip: If you're using a glass build bed with glue for adhesion, try placing your bed in the freezer for 15-20 min and your PLA function volition pop right off!
Rough Cleaning and Part Preparation
Depending on the blazon of part and printing method y'all've used, the first thing you lot'll desire to practice is remove any support material clinging to the part textile. In that location are several methods for removing this material.
Soluble Back up Materials
If the printer you're using creates part supports using a soluble material, soaking the part in hot h2o with a strong detergent (specified past the manufacturer) for several hours, depending on the role size, may exist sufficient for support removal.
A sodium hydroxide bath tin can also help dissolve support material such as HIPS.

Agitating the water with a pump to ensure constant fluid motion over the surface of the part will also be important in processing these types of components.
Ultrasonic tanks are a useful apparatus for cleaning soluble support textile from complex components with a large expanse. These may make clean components more quickly and with greater success than a simpler agitated bath.
Consult your 3D printer manufacturer for boosted data regarding the necessary equipment or procedures to remove soluble support cloth from your printed parts.
Unmarried-Extruder Systems
For single-extruder blazon 3D printers, where support cloth is printed using the same material that comprises the part itself, start by removing every bit much material as possible using your easily or a pair of needle-nose pliers.
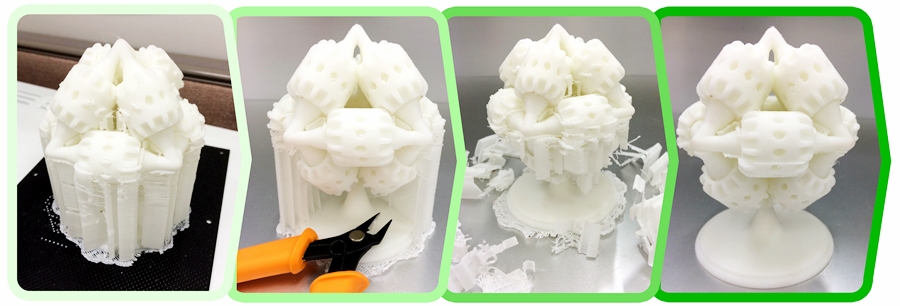
A small pair of flush-cutters, used for cutting wire, too come in handy during this process.
Additionally, a small set up of files and dental tools tin can help reach those nooks and crannies that are hard to attain.
Depending on your settings, the fabric, and the algorithms implemented in your printing software, the bulk removal of support material can be quite easy or possibly quite frustrating. And so patience is key hither.
Pro Tip: A simple handheld scratch awl can also be very useful for cleaning out small holes, channels, and crevices in printed parts.
Tackling the Rough Imperfections
Following any major operations using pliers and cutting tools, many 3D printed parts volition still have undesirable imperfections, including "strings" of material extending from the outer surfaces and rough edges where the support cloth has broken away from the function.
In these cases, consider carefully sanding the rough surfaces of the office using sandpaper. Beginning with a rough grit such as 150 to have intendance of major imperfections and piece of work your fashion to 600 grit.

It's worth it to utilize this sanding method equally the finer newspaper mostly isn't suitable for treating fibroid surface imperfections, all the same fibroid paper lone may leave deep scratches.
Wet-sanding plastic using 600 or 800 grit paper can produce a fairly smooth stop on apartment surfaces.
Pro Tip: Check out our Ultimate Guide to Finishing 3D Parts for more than item on how to create a perfect finish.
For more accuracy on smaller external features, use a gear up of micro files, often used for jewelry applications.
A rotary tool with sanding and polishing bits tin also be very useful for difficult-to-reach surfaces that require sanding.
Take care not to sand abroad areas of the role itself, particularly with electrical tools! At high RPMs, you may take a chance slightly melting areas of the part, so practice on spare parts first if possible.
Working Out the Minor Details
Afterwards yous've taken care of the major imperfections, yous may be left with areas of the role which have sand marks or other discoloration. Depending on the material, there are several ways of cleaning upwardly these areas.
Estrus Gun
A heat gun is a useful tool for very slightly melting the part yous're cleaning. This tin be used to clean up the discolored patches of textile you might detect, for example, in PLA or ABS after a sanding functioning.
Be very careful here as yous tin can deform or melt away features in your role when using whatsoever course of oestrus treatment. Employ hot air from the heat gun in a sweeping motion several inches from the surface of the component, checking to be sure you aren't causing harm.
Polishing $.25
You might too consider experimenting with polishing bits, used for buffing ceramics or metals, to smooth out surfaces on 3D printed parts.
Acetone
Finally, for ABS parts, acetone can be used to create a smooth, sleeky finish. When placed in a jar containing acetone vapor, the exposed surfaces of the printed part will dissolve over time, reducing the appearance of layer lines.
Note that the surface of an acetone vapor treated part will continue to dissolve for some fourth dimension after it's been removed, then it'south a good thought to practice on a few spare parts before trying this method on production components.
Also exist sure to follow standard safety protocol when using acetone. Just handle it outside or in a well-ventilated space as the vapors are harmful and continue information technology away from flame or excessive heat since it'southward likewise very combustible. Refer to an acetone MSDS for more details.
3D Office Cleaning Tool Listing
Lastly, here's a list of all the tools mentioned in this article to help you get started cleaning 3D parts:
- Broad and narrow flexible metal putty knives
- Needle-olfactory organ pliers
- Scratch awl
- A pair of small flush-cutters
- Sandpaper (150-800 grit)
- Micro file set
- Rotary tool with sanding / polishing bits
- Estrus gun
- Acetone
- Wax carving tools
Equally always, feel free to reach out to the Fictiv Team at assist@fictiv.com with any additional questions!

Source: https://www.fictiv.com/articles/methods-for-cleaning-3d-parts
Posted by: fetternithe1959.blogspot.com
0 Response to "How To Clean Up 3d Printed "Miniatures""
Post a Comment